Earrings,Necklaces and Bracelets, Oh my!
I don't have tons of jewelry but the few that I do have often get tangled up in each other and I don't really have any sort of jewelry box, so when I saw Jewlery organizers all over blogs, I figured I could do one of my own for my bathroom where I typically keep my jewelry. Jeremy's mom found some old frames in her basement that were absolutely beautiful. With all the DIY I've been doing lately she though I could use them and I sure could!
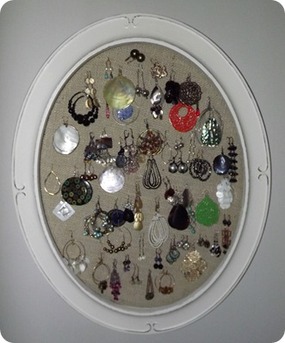
My inspiration was my favorite photo for a jewelry organizer:
My inspiration was my favorite photo for a jewelry organizer:
Materials:
To start, I cut out the cork board to fit the size of the frame. Then I laid some of the leftover wallpaper face down and put the cork board on top. I folded down the corners and used hot glue to hold the wallpaper onto the cork board. Then I simply slipped the cork into the frame just like a typical photo frame backing and taped it on to secure it on the back.
Then I hung it up on the wall, put some push pins in certain spots that worked for me and hung up my favourite jewelery pieces!
TADA!!!
- Frame (free!)
- Cork board (I had leftover but only $2 at the dollar store for two boards)
- Wallpaper (leftover, but you could use leftover fabric, burlap, plain cork, anything you want!)
- Push pins
- Hot glue gun
- Scissors
To start, I cut out the cork board to fit the size of the frame. Then I laid some of the leftover wallpaper face down and put the cork board on top. I folded down the corners and used hot glue to hold the wallpaper onto the cork board. Then I simply slipped the cork into the frame just like a typical photo frame backing and taped it on to secure it on the back.
Then I hung it up on the wall, put some push pins in certain spots that worked for me and hung up my favourite jewelery pieces!
TADA!!!
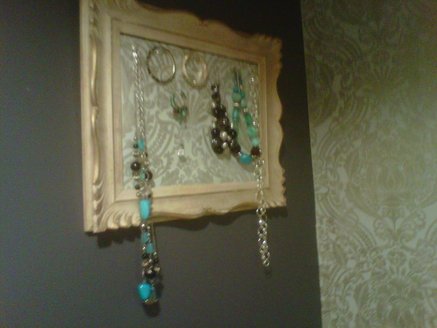
Sorry again for the terrible photo quality! A new camera is on the Christmas wishlist for me!
